The nursery took far longer to finish than anticipated. We made a big dent in it in January and then the work came to a halt. My husband had to have surgery that didn’t go to plan and resulted a very long recovery. He’s good now and ready for baby. Luckily, I got some help from friends and family to speed things along so the nursery could be completed before baby girl’s arrival. A huge thank you to everyone who helped!!
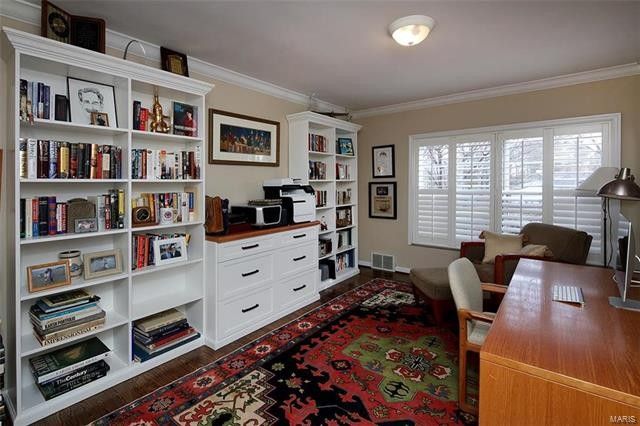
I’ve had so much fun putting together a girly nursery for the newest member of the family. The room that we converted into the nursery was set up as an office with built in bookshelves and a printer station. That eliminated the need to buy furniture other than a crib, side table, and glider.
We added some doors to cover up the bookshelves for safety purposes once the baby starts pulling up, plus we gained additional covered storage.
I knew I wanted to keep the walls fairly simple so it would be easier to change if we have a second child that’s a boy. We painted the walls Charming Pink by Sherwin Williams and added some framing to the wall the crib is on for visual interest and frame out her name sign on the wall.
I love Lilly Pulitzer’s fun, bright tropical prints so I added little Lilly touches here and there. I framed fabric above the diaper changing station and found matching curtain tie backs and a matching pillow for the glider. I kept with the tropical theme of the Lilly print and added in a flamingo rocker and elephant hamper basket. I also changed out the light for a girly chandelier, added additional overhead can lighting, and a plush custom rug from Stanton Carpets that my husband purchased from his flooring store.
We’re all ready for baby and patiently waiting for her arrival!
It’s officially Fall! I’ve spent the weekend making turkey chili and decorating the house and porch for Halloween. This year, I decided to make some pumpkin topiaries for the front porch that I could use for both Halloween and Fall.
1. Gather supplies you’ll need: – 6 craft pumpkins (I found mine at Michael’s Crafts) – Paint for the pumpkins (optional) – 2 Bamboo sticks or dowel rods to stack the pumpkins on – 2 Pots (I purchased inexpensive plastic pots from Home Depot and spray painted them) – Rock to weigh down the pots (I found a large bag of river stone at Home Depot) – Decorative Halloween and Fall picks to add to the pots – Drill with ½ inch bit
2. Paint the craft pumpkins. I added orange stripes to the white pumpkins for a pop of color.
3. Drill a hole through each of the stems of the pumpkins.
4. Mount the pumpkins on a bamboo stick.
5. Fill the pots with rock and insert the bamboo stick with pumpkins on it into the rock.
6. Add some flare to the pots. I decorated a pot for Fall and a pot for Halloween. After October, I will change out the Halloween decorative picks for the Fall picks.
Halloween
Fall
There you have it! These topiaries were easy to make and less expensive than store bought topiaries. Plus, you have the flexibility to decorate them for the holiday and the season as a whole.
I have managed to furnish and decorate most of our house with items from estate sales. You know what they say, one man’s junk is another’s treasure. Estate sales offer you the opportunity to find great pieces at a discount, plus you can find unique handcrafted items or antiques. Personally, I enjoy the history of the items I find. It’s fun to look at pieces in my home and know another family enjoyed them before we did.
Estate sales can be a little intimidating and if you’re like me, you might be concerned about making sure the items you’re purchasing are in good condition for their listed price. Here are some shopping tips to make your estate sale experience a pleasant one.
1. Download an app to source sales. I use EstateSales.net. This app is fantastic! You can tailor your settings to your current zip code so that you can see sales around your area within whatever mileage radius you set. This app also features photos of the items at the sale so you are able to preview the sale prior to going. I usually scout out the weekend sales on Wednesday and Thursday, most companies post photos by Thursday.
2. Always know the terms and conditions before you go. The companies that host estate sales all have different terms, conditions, and rules. Most of the time, they are listed on the EstateSales.net app or the company’s website. Some only take cash so be prepared to have plenty of cash on hand if you think you want a larger ticket item. Also, learn the company’s policy on how you claim the items you want. Some companies allow you to “pull the tag” on the item and bring it to the cashier at the end of your trip through the house. Others require you to put a sold sign on it and will sell the item to someone else if you take the tag off. If their policies aren’t listed online, make sure you ask a member of their staff when you arrive.
3. Get a number. Most estate sale companies allow those with numbers to access the sale before the general public on its opening day. If you have your eye on something, register for a number or arrive early to the sale to get one. If you are going to a sale with a friend, make sure you each have numbers to enter the sale.
4. Bring some muscle with you. Unfortunately, most companies won’t help you move items out of the house once you purchase them. However, most will hold items that you’ve purchased and allow you to come back to collect them later in the day or on the final day of the sale.
5. Be choosey. Don’t buy something just because it’s a good deal. Take a minute to think about where you will put the item in your house or how often you’ll use it. I try to have a plan for everything I buy in order to prevent myself from buying something just because it’s inexpensive. However, if you really want something, jump on it. I purchased this mirror at an estate sale and I cannot fathom my entryway without it.
It had a big price tag on it and I didn’t want to spend that much. We were about to drive away from the sale and my sister-in-law encouraged me to go back and place a bid. I’m so glad she did. I entered a bid for 60% of the price and since no one purchased it for full price, I ended up winning the mirror that night.
6. Don’t judge a house. Be prepared, some of the houses can be rundown on the inside even if it doesn’t look that bad in the photos. I went to a sale knowing I wanted the gold sconces inside (pictured below) for our dining room. The house was in bad condition, but I’m so glad I didn’t run out and hunted for the item I came for. I purchased the sconces right off the wall for just $10. They are a focal point in our dining room, and I get so many compliments on them.
7. Be careful with fabric items. I have only purchased a few fabric items from estate sales, a pair of chairs and a rug. I bought them from clean, non-smoking households. If you have pets that mark, like dogs, you might want to find out if the owner had pets before you buy fabric items from a sale. Also, you might want to ask if the items were ever in a different location in the house. Companies can stage houses and might move items up from a damp basement or location that isn’t ideal.
Even though estate sales can be intimidating, they are well worth the time it takes to treasure hunt. Good luck on your next estate sale adventure whether it’s your first or you’re a seasoned veteran. I’d love to see your favorite finds. Happy hunting!
Some of my favorite finds:
Seagrass Basket
End Tables and Coffee Table
Oriental Rug
Crystal Wine Coaster
Lamps
Coffee Table, End Tables, and Painting
Custom Lamp, Console Table, Painting, Candelabra, and Clock
We embarked on our bathroom remodel because there was a problem with the plumbing. The shower was dumping gallons of water into our basement. We stopped using it and shut off the water while we determined what to do about it. However, plumbing doesn’t like to sit unused and it eventually began to emit sewer gas smells throughout the house, so we jumped in.
There can be a lot of pressure when you remodel a bathroom because it feels very permanent. Most people only remodel their bathrooms one time while they’re living in their homes, so it’s important to make sure you’ll like the finishes in the present and going into the future.
It can be hard to predict what your tastes will be throughout the time you live in your home, so I recommend sticking with styles that are timeless, not trendy. My recent remodel reminded me that there are ways to play with trends without being stuck with them down the road.
Selecting materials for this bathroom took some thought and consideration since we will not be renovating it again. I knew I wanted to use white marble, it’s such a timeless material. Marble is everywhere and has been for centuries, I’m not worried about it going out of style. I went with rectangular tile on the floor. I didn’t want to do anything busy because it’s a long and narrow floor. Anything thin and long would make it look like a bowling alley, so I just kept it simple.
I did add some flare in the shower using the herringbone tile pattern and I love it. I also added a vanity to ceiling backsplash on the sink. I’m really happy with the way it turned out. This is something that could be viewed as trendy. If I’m ever tired of it down the road, we could technically rip it off and drywall the area. I don’t ever expect to do that, but just one example of how you can change things up down the road.
I did think quite a bit about what finish to go with on the shower head, faucet, towel bars, etc., and I went with the matte gold. Again, this is something that could be considered trendy down the road. I can always change these things out. It would be an expensive pain, but again, it is an option.
Vessel sinks are my favorite and I’m so happy with the way the vanity as a whole turned out. I think it’s my favorite part of this design. I met with a cabinet maker to create the vanity and he tried to steer me away from stained wood and just go with white instead. Monochrome white is very in right now, but I wanted to bring a bit of that French country vibe into the bathroom.
I have always planned to move a washing machine and dryer up to our first floor because the laundry is in our unfinished basement. I took this opportunity and we added a stackable washer and dryer into the bathroom remodel. Because of this addition and the window in the bathroom, I was somewhat locked into the old layout of the bathroom.
I moved everything down a bit for the washer and dryer closet and took some of the real estate from the shower and long vanity that was in place previously. If the window wasn’t in the bathroom, I would have put the shower at the end so that the bathroom didn’t feel so long, but with older houses, sometimes you just have to work with what you’ve got. I wasn’t willing to take out the window or add glass privacy blocks.
Bottom line, there are SO many decisions that you have to make when remodeling a bathroom. Many I didn’t even think of before we started this process. My advice, take your time and really think about what you want. Don’t rush through the process and make knee jerk decisions that can and will impact other decisions as you go.
All of the photos from the remodel, start to finish.
I have been slowly working on refreshing our master bedroom since November. Part of the refresh was purchasing new bed linens. I traded out our dry clean only duvet cover for a washable duvet and I couldn’t be happier with that decision. It’s so nice to be able to throw it in the washing machine instead of having to haul it to the dry cleaner. Not only was it time consuming, but expensive.
I’ve been washing our new duvet cover frequently ever since flu season and COVID ramped up. I always dreaded getting the insert into the cover, but I’ve figured out a quick and painless way to get the insert into the cover.
Before
After
1. Clear a large, clean space on the floor where you can lay out your duvet insert flat on the floor.
2. Turn your duvet cover inside out with the ties facing outward.
3. Lay the duvet cover on top of the duvet insert.
4. Match the ties on the cover to the insert and tie them.
5. Put your arm inside of the duvet cover and grab one of the top tied corners to begin to turn the cover right-side out. I found it was easiest to bunch up the duvet over my arm. Once one corner is partially turned right-side out, do the same to the other top corner.
6. Shake the duvet out and flip the bottom corners right-side out.
7. Button the buttons along the bottom of your duvet cover.
There you have it! This method is really simple, and I can do it easily without help. I’m hoping to finish updating our master bedroom soon. Next I will be working on the flooring, paint, and curtains. I’m looking forward to sharing the final product with you!
When we first moved into our house two years ago, it needed a lot of work… and still does. There was a rickety screened in porch coming off of the back of our house that needed attention as soon as possible.
Each year we’re biting off a big project, but we tackled this project first, not because it was our first project of choice, but because it desperately needed to be done. The screened in porch had major structural issues.
Since we live in Missouri, the pollen capital of the world, we decided to make the screened porch a room that we could live in year-round. I love screened porches and it hurt my heart a little bit to glass it in, but it just wasn’t practical with my bad allergies.
The majority of the before pictures below have the previous owner’s furniture. I didn’t decorate this space when we moved because I knew it would be short lived. I just used some older patio furniture out there for a few months until we started our project.
Before
Before
Before
Before
After the structure was shored up, we added windows where the screens once were. I loved the terrazzo floor that was on the screened in porch, but we needed to take it up to install a heated floor. If you are converting a room from a screened in porch to a glassed in porch and live somewhere with severe climate changes, this is a must. It will take the room from a two-three season room to a room you can be in year-round. We also added in a mini-split heating/cooling system and ceiling fan to help make the room a pleasant temperature.
Now for the fun part, the design.
I selected a wood-look tile that complimented the wood floors in our kitchen and living room. Both of the rooms flow into the glassed in porch so I wanted to make sure the materials complimented each other. I was limited to tile because of the heating element in the floor. I knew I would want an area rug to make the room cozier so the installer added a second zone so the floor can be cooler where the rug is.
I chose the big plank tile in the middle.
This room was tricky because I didn’t want it to feel like a sterile white box, yet it was important to me that the window framing just kind of disappeared so you’re focused on nature and not the paint color. I chose Snowbound from Sherwin Williams, a pure white with cool undertones. It’s important to test paint colors, especially whites, because they all have different undertones. Some paint chips that looked pure white in the store ended up looking yellow in the new room.
My favorite part of the room is the wood beams. They are dark brown to compliment the floor, make the room cozy, and give it that wow factor.
After paying for the renovation of the room, I didn’t want to spend a fortune on furniture. I also took into consideration that anything in this room would likely get bleached out by the sun overtime, so neutral furniture was a must. Not including the renovation cost, I was able to furnish and decorate this room for under $2,000.
I love the look of the Pottery Barn slipcover couches and chairs, but they were more than I wanted to spend. I found these dupes at Ikea and both couches and chairs were about $1,300, costing less than one Pottery Barn couch.
The rug came from an estate sale for $150. I love estate sale prices, but if you’re buying something cloth or fabric, make sure the item was well cared for. This rug came from a beautiful condo and was in a dining room that was hardly used. Once this rug is bleached out by the sun, I will likely replace it with something neutral unless I find another gem at a sale.
The coffee table and end tables came from a different estate sale. They were only $40 and to date one of the best deals I’ve ever found. Pro tip, estate sales usually offer 50% off on items on the last day of the sale.
Everyone likes to sit in this room, relax, and nap…especially the dog.
I hope you all enjoyed this transformation as much as I do. Reach out to me if you want more advice about how to execute a large renovation project like this. Our back patio was the next project we took on when we moved. Make sure you subscribe to 21 Lane so you don’t miss those shocking before and after photos.
I hope everyone was able to celebrate Easter today despite the quarantine. We had a fun day together and decided to get dressed up in something besides sweatpants and make an Easter meal for just the two of us.
I set the table with a fun Easter/spring theme and we had steak, potatoes, and a salad for dinner and cute bunny cakes for dessert.
On the table I used our Lenox china paired with bunny plates from Pier 1. I love these bunny plates and you can really use them all spring long since they aren’t Easter themed. I’m sure all of the Easter/spring tabletop decor will go on further sale tomorrow so keep an eye out if you need anything.
Spring is finally in the air; I am so excited for longer and warmer days! This week has been totally crazy for us. I was off work because I am starting a new job on Monday! I am transitioning to a company that markets St. Louis to companies in an effort to get them to have a physical presence in our city (aka economic development). Change can be scary, but I am excited for a new challenge.
The timing actually ended up perfect because we have been in the process of buying a flooring company, County Flooring! After a very long process, we finally became the owners last Sunday! Before the sale was completed, I thought I would have most of the week to myself to get a lot of things done around the house, so I made an aggressive list. I ended up getting the majority of it done even though I have been scrambling to finish up the content for County Flooring’s website, Facebook, and Instagram pages. Check them out!
Now that you are all caught up on our crazy lives, I want to give you some spring decor and cleaning/organizing tips. Two of the most time-consuming items on my to-do list this week were putting away all of the winter decor, decorating for spring, and getting some spring cleaning done.
Spring Decor Tips
1. Keep things simple. I’ll be the first person to admit that I go overboard decorating in the winter and for Christmas. I think of spring as a simpler time of year, a time to start fresh. I just added a few items to the front porch, entryway, and mantle for Spring/Easter.
2. Incorporate Easter. Incorporating Easter decor is an easy way to decorate for spring. Plus, if you purchase items that aren’t “strictly Easter” (ex. bunny with eggs), you can use them after Easter is over. The yoga pose bunnies above can be used all spring. I purchased the bunnies on the mantle in a closeout sale and I will also be able to use them all spring versus needing to put them away after Easter.
3. Add in some green. I love adding artificial plants into our sunroom and other areas of the house. I would have real plants if I could actually keep any plant alive haha. I have a few plants on the end tables in the sunroom that will likely stay there all spring and summer long. I have a handful of topiaries and artificial plants that I use throughout the house during spring and summer. I found the topiaries below at an estate sale for just a few dollars and the others came from Home Goods.
Spring Cleaning Tips
We didn’t do any sort of spring cleaning last year because we moved into our house May 2018 and we were doing some construction, but man did we accumulate a lot of stuff over the past two years. Admittedly, we haven’t been the best with organization.
1. Start with an idea of what areas you want to tackle. If you have a short period of time to get things done like I did, don’t plan to clean and organize your entire house. Take it in chunks. Everything takes longer than you think. I focused on the kitchen and our bedrooms/closets.
2. Figure out what you can part with. I know I can’t be the only person that buys new items, but doesn’t give away or sell the old items. I’m especially bad about this with clothes and accessories. I have made a lot of trips to resale shops and charity drop offs this week. If you feel guilty parting with items, take them to a resale shop before donating. I made over $300 this week just selling clothes/accessories I wasn’t wearing or using anymore. Now I have a cleaner closet and money to spend on some of my decor projects.
3. Organize, organize, organize. It’s always helpful to be able to see what you have clearly. This goes for any area in your house. If you can’t glance in your pantry and see what you have, you will likely buy more of the same food that you already have. Same goes for your closet, if you don’t see it, you won’t remember you have it to wear it. I find it’s best to move things around so everything is visible. It helps me to put similar foods next to each other. It also helps me to have my closet organized in sections, sleeveless tops go in one area, short sleeves in another.
My goal is to keep everything clean and organized all year and to frequently clean out the old when I purchase something new. Happy spring decorating and cleaning!
In honor of Valentine’s Day, I thought I would let my Valentine, John, take over my blog. He is the muscle and power tools behind all of my projects and ideas, making everything possible.
A lot of 21 Lane’s home decor requires
installation, as a husband I am clueless about design. However, I do know a
thing or two about installation, basic carpentry, and getting things hung up
properly so that they are straight and level. Even in hard-to-work-with
material like plaster.
The number one thing to remember about being “handy” is having the courage to dive in, you’re going to mess up, but you’ll learn with time and practice. YouTube and Google will be your best friends! You can always hire somebody if you get in over your head, but overtime as your skills improve you will be able to do more yourself and save a TON of money. Plus, knowing that you did the work is very satisfying… and the beer you drink while you stand back and look at what you’ve done tastes that much better 🙂
Before
During
After
We replaced the TV in our living room when it went out. It probably would’ve cost at least $200 to hire someone to install it for me, but I did it in a couple hours on a Saturday and it is perfectly level. Our niece had to watch cartoons on a crooked TV, I fixed that for next time 🙂
So, how do I know about all of this stuff? I am not a contractor, but I did do construction for several summers in high school and college. I eventually became a farm manager/handyman/Mr. Fix It. I re-roofed the farm garage, hung gutters, fixed toilets, installed lighting, and hung TVs. Plus, I built shelves in the garage, a 2,000-foot-long fence, gates, and outdoor storage containers. I even taught myself how to operate a backhoe (one of the big yellow ones you see on construction sites).
I had almost no experience at the time (other than basic carpentry), but I never wanted to tell them I couldn’t do something. I spent my days working and my nights googling how to do it. I messed up, a lot, but I got everything done and done right.
After college, I went to work in the finance industry. Doing work around the house is something I enjoy, and I’ve saved us so much money over the years.
So, I’m going to give you two different setups of tool kits so that you too can become handy. A little advice from my Grandfather can kick us off, you should always buy the best tool you can afford. Quality tools last for many, many years and you’ll get tons of use out of them.
Tool Kit 1: The absolute bare minimum, every homeowner should have these items to address minimal household projects. If you aren’t very familiar with tools, I would start with these items.
Hammer
Scissors
Phillips and flathead screwdrivers
Tape measure
Torpedo level
Pliers
Duct tape
Vice grips
WD-40
A basic tool organizer (i.e. a tool box or bag)
Tool Kit 2: You’ve been sharpening your skills and you want to take on more projects, but you still want to leave big projects to the pros. This is my setup and it should allow you to do about 85% of home projects and repairs.
My Tool Kit
Laser Level
Drill/Impact
Screwdriver set
Duct and electrical tape
Electric socket tester
Scissors
Channel lock cross cutting pliers with end cutter (useful for removing nails)
Needle nose pliers
Chisel
Cat’s paw (small)
16 oz hammer with curved claw
Adjustable wrench (small and large)
Wire cutters
Wire stripper
Tape measure (I like the ones with fractions on the blade)
Construction calculator, simple model is fine
Standard adjustable pliers (small, medium, and large)
Pencils
Laser level and measuring laser (optional)
Nail set
Good scissors
Staple gun
Super glue and wood glue
Stud finder
Metric and standard allen wrench set
Lights
A non-contact voltage detector (this thing will keep you from getting zapped when doing electrical work)
Zip ties
Utility knife
Torpedo level
Laser measuring tool
20 feet of 550 lb test paracord (this has a zillion uses)
Safety glasses
Ear protection
Drills
Impact Drivers
Pictured above are 12 and 18 volt Milwaukee Drills and Impact Drivers. If you never plan to “heavily” use them, you can get away with 12V (any brand). I’m pretty partial to Milwaukee because their tools are very high quality. No matter what brand you purchase, stick to lithium batteries.
The larger ones are 18V and they are substantially more powerful than 12V, but for home use the 12Vs can do almost everything the 18Vs can. Also, purchase a high-quality impact bit set. The 12V set pictured can take care of most home chores.
Screwdrivers, get a good set, even the Torx ones too. I find that for home use, Husky/Cobalt ones are sufficient. I am partial to Craftsman because I’ve had them since I was a teenager (they are actually made by the same company that makes Husky set, western forge).
A stud finder is necessary in order to hang heavy items on the wall properly so they don’t tear through the dry wall or fall down.
Here are some of the tools mentioned above that belong in every handyman or woman’s arsenal. Pencils (I bought hot pink because I always lose them), a bright LED light, channel lock pliers, nail puller, and of course, the cat’s paw pry bar.
You also need a basic socket set. Putting together IKEA type furniture is a breeze with these tools. I always laugh when I see the cheesy Chinese wrenches that come with them before throwing them in the trash. That’s why people get so frustrated haha. Having the right tool makes assembly a piece of cake.
Lastly, I really like the 5-gallon bucket organizers. If you break the bucket, they are only a few bucks and keep everything well organized. Another thing while we’re talking about buckets, get and keep a few 5-gallon buckets at your house. The uses are endless.
This entire set fits in one bucket. Your tool set will likely differ depending on your needs. This set isn’t all inclusive, but it is sufficient for most minor home repairs. This kit doesn’t include all of my tools, but it is enough to get you off to a great start.
You might have noticed in the photos that all of my tools have green paint or tape on them. I do this so I can easily identify my tools when I’m working on a project with someone or I lend my tools to a friend. It’s important to mark your tools with a color or write your name on them.
Remember, you don’t have to run out and buy all these tools right away, I’ve accumulated all of these over a period of 15 years or so. When you need a tool, buy it and get a good one. If you don’t think you’ll use it more than once, most home centers have an affordable tool rental system. Have fun with your next home project, don’t forget, YouTube and Google are your best friends!
I mentioned a few weeks ago that my family did a Mexican cuisine themed Christmas this year. The food was amazing and it was nice to change it up and do something different. I made Churro Cheesecake Bars and Guacamole. I wanted to share the recipes with you all for your next Taco Tuesday.
Churro Cheesecake Bars – 45 minutes including bake time
These Churro Cheesecake Bars are very simple to make and delicious. I found the original recipe on food.com and made them the day before our gathering. I just stored them in the refrigerator until we were ready to eat.
Ingredients Cheesecake 3 (8 ounce) packages cream cheese, room temperature 3/4 cup sugar 1 large egg 2 teaspoons vanilla extract 2 tubes crescent rolls
Topping 1/4 cup sugar 1 teaspoon ground cinnamon
1. Preheat oven to 350 degrees. Grease a 9 x 13 pan with nonstick cooking spray. 2. Beat the cream cheese and sugar with a hand mixer until fluffy. 3. Add the egg and vanilla and mix until all ingredients are blended together. 4. Place one tube of crescent rolls on the bottom of the 9 X 13 pan. Pinch the seams together. 5. Spread the mixture on top of the crescent rolls evenly. 6. Add the second tube of crescent rolls on top of the mixture. Pinch the seams together. 7. Sprinkle the cinnamon and sugar topping on top of the crescent rolls. 8. Bake for 30-35 minutes or until golden brown. Allow to cool before serving.
Guacamole – 20 minutes
I also made guacamole and served with tortilla chips. This is my favorite way to make guacamole. The olive oil is a game changer and not usually incorporated into guacamole recipes. It prevents the avocado from turning brown quickly and blends well with the other ingredients. I easily quadrupled this recipe for a larger group, but the ingredients below serve about four people.
Ingredients 1 tomato diced 1/2 red onion, finely chopped 1 jalapeño pepper, finely chopped 2 tablespoons cilantro, Finley chopped 1 avocado 1-2 tablespoons olive oil (you can always add more) Juice from 1 lime Sea salt
1. Deseed and mash the avocado. I usually use a fork so that the avocado is a little chunky and not too smooth. 2. Stir in diced tomato, chopped red onion, chopped jalapeño, and cilantro. If you don’t want your guacamole spicy, just leave a few seeds in it. If you want it to be spicy, add in more. I save the seeds and gradually add them in, tasting as I go. 3. Stir in the olive oil and lime juice. 4. Salt to taste.
I hope you all enjoy these recipes as much as we did! Fiesta!!